There are few things as satisfying as a tray of freshly baked pirozhki coming out of the oven — golden on top, soft all the way through, and stuffed with a filling that perfumes the whole kitchen. Pirozhki (singular: pirozhok) are yeasted buns filled with either savory or sweet fillings, and they've become deeply embedded in Armenian home cooking through generations of cultural exchange with Russian and Eastern European neighbors. In Armenian households, they show up at Sunday lunches, at church socials, and tucked into school bags as the most enviable lunch possible.
Pirozhki in the Armenian Kitchen
The word "pirozhki" comes from the Russian "пирожки," and the dish traveled into Armenian cooking during the Soviet era and through the diaspora communities of Los Angeles, Paris, and beyond. But Armenians didn't simply adopt it — they adapted it. Armenian pirozhki tend to be on the softer, enriched side, often baked (though some families fry them), and the fillings reflect what's available and what's beloved: spiced ground meat with caramelized onion, or potato mashed with butter and dill.
Once you master the dough, pirozhki become one of the most flexible recipes in your kitchen — the filling can change every time.
The Dough
The foundation of great pirozhki is an enriched yeasted dough — soft enough to be pillowy but sturdy enough to hold the filling without tearing. This recipe makes about 16 medium buns.
Dough ingredients: 2¼ tsp active dry yeast, 1 cup warm milk (about 110°F), 1 tbsp sugar, 3½ cups all-purpose flour, 1 tsp salt, 2 eggs (1 for the dough, 1 for the egg wash), 4 tbsp unsalted butter (softened).
The Fillings
Meat Filling
Ingredients: 1 lb ground beef or lamb, 1 large onion (finely diced), 2 tbsp vegetable oil, ½ tsp black pepper, ½ tsp cumin, ½ tsp paprika, salt to taste, fresh parsley (chopped).
Potato Filling
Ingredients: 4 medium russet potatoes, 3 tbsp butter, ¼ cup warm milk, 1 small onion (finely diced and sautéed until golden), salt and black pepper, fresh dill or chives.
How to Make the Dough
- Warm your milk to about 110°F — it should feel warm but not hot on your wrist. Stir in the sugar and yeast. Let it sit for 10 minutes until foamy and fragrant. If it doesn't foam, your yeast is dead — start over with fresh yeast.
- In a large bowl, combine the flour and salt. Make a well in the center. Add the yeast mixture and one beaten egg. Stir until a shaggy dough forms.
- Turn out onto a lightly floured surface and knead for 6–8 minutes until the dough is smooth and elastic. Add the softened butter a tablespoon at a time as you knead — it takes a minute to incorporate each addition but the result is worth it.
- Place the dough in a lightly oiled bowl, cover with a clean towel, and let it rise in a warm spot for 1 to 1.5 hours until doubled in size.
How to Make the Meat Filling
- Heat oil in a skillet over medium-high heat. Add the diced onion and cook until deeply golden, about 12–15 minutes. Don't rush this — the caramelization is the flavor base.
- Add the ground meat, breaking it up with a spoon. Cook until browned and no longer pink, about 8 minutes.
- Season with black pepper, cumin, paprika, and salt. Taste and adjust. Remove from heat, stir in fresh parsley, and let the filling cool completely before using. Warm filling will make the dough soggy.
How to Make the Potato Filling
- Peel and boil the potatoes in salted water until completely tender, about 20 minutes. Drain well.
- In a separate pan, sauté the diced onion in butter until golden and soft.
- Mash the potatoes with butter and warm milk until smooth. Fold in the sautéed onion, season generously with salt and pepper, and add fresh dill or chives. Let cool completely.
Shaping and Baking
- Preheat your oven to 375°F. Line two baking sheets with parchment paper.
- Punch down the risen dough and divide it into 16 equal pieces. Work with one piece at a time, keeping the rest covered.
- Flatten each piece into a circle roughly 4 inches across — don't roll too thin or the bun will tear. Place a generous tablespoon of filling in the center.
- Bring the edges up around the filling and pinch firmly to seal. Place seam-side down on the baking sheet. Leave about 2 inches between each bun.
- Cover loosely and let them rest for 20 minutes — they'll puff slightly. Beat the remaining egg with a tablespoon of water and brush each bun generously.
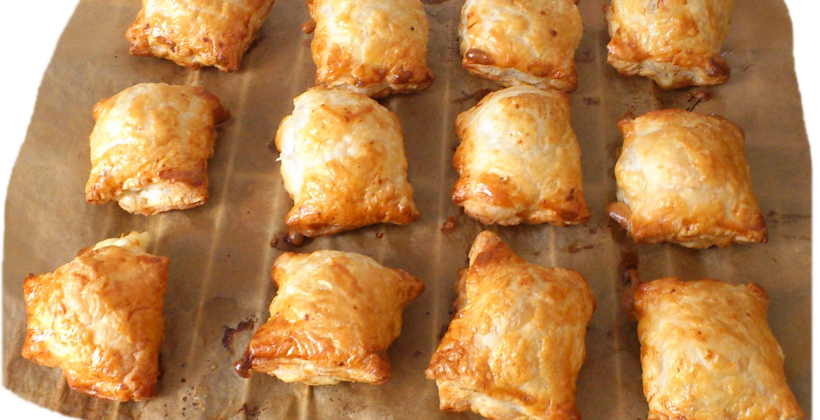
- Bake for 20–24 minutes until deep golden brown. The undersides should be fully set — lift one and check. Let cool on a rack for at least 10 minutes before eating.
Fried Pirozhki (Optional)
If you prefer the fried version — and many Armenian households do — the process is straightforward. Shape the buns the same way. Heat about 2 inches of neutral oil in a deep skillet to 350°F. Fry a few at a time, seam-side down first, for 2–3 minutes per side until deep golden. Drain on paper towels. Fried pirozhki have a crispier exterior and richer flavor, but baked pirozhki keep better and feel a little lighter.
Tips for the Best Pirozhki
- Cool your filling completely. Warm filling makes the dough wet and the buns difficult to seal. Make the filling the night before if possible.
- Don't overfill. A heaping tablespoon is the right amount. More than that and the buns will burst.
- Seal tightly. Pinch the seam firmly and press it together. Any gap will open in the oven.
- Let them rest before baking. That 20-minute rest after shaping makes the buns noticeably lighter and more pillowy.
- Brush generously with egg wash. This gives them their beautiful mahogany color. Don't skip it.
Serving and Storing
Pirozhki are best eaten the day they're baked, warm or at room temperature. They reheat well in a 325°F oven for 8–10 minutes — much better than the microwave, which softens the exterior. They also freeze beautifully: freeze them fully baked on a sheet pan, then transfer to a bag. Reheat from frozen at 350°F for 15–18 minutes.
Serve them with a simple side of sour cream or plain yogurt for dipping. They pair wonderfully with a cup of Armenian black tea. And if you're making them for a crowd — and you probably should — just double the recipe. They will disappear fast.